

Shape a workbook on the canvas
Use the canvas to decide how a workbook becomes records. The workbook stays beside the model you are shaping, and a dry run checks the reading instructions after each change. You need Model authoring. Creating a workspace also needs permission to create workspaces and install models; see Workspaces. Workbook onboarding explains the draft, its workbook and the saved reading instructions.
Open the canvas and read the page
Section titled “Open the canvas and read the page”- Choose New workspace from a workbook, select an XLSX workbook or CSV file and enter Name. Choose Read the workbook. At What refiroo found, choose Adjust. This keeps the proposed draft and opens its canvas; no workspace has been created yet.
- For a draft that already has a workbook, open the draft and choose Canvas in the Editor | Canvas switch. Both views edit the same saved draft.
- Read the three parts: Workbook on the left holds sheets, columns and First rows; the board in the middle holds a card per object type; the inspector on the right explains the selection. Navigation there shows the applications’ navigation groups.
- Read Proposed as a suggestion still unchanged from the workbook proposal, not as confirmation that the model is right. A card shows its name, attributes, relationships, columns that fill them, Filters and check counts. no column yet means that the workbook does not currently fill that attribute or name.
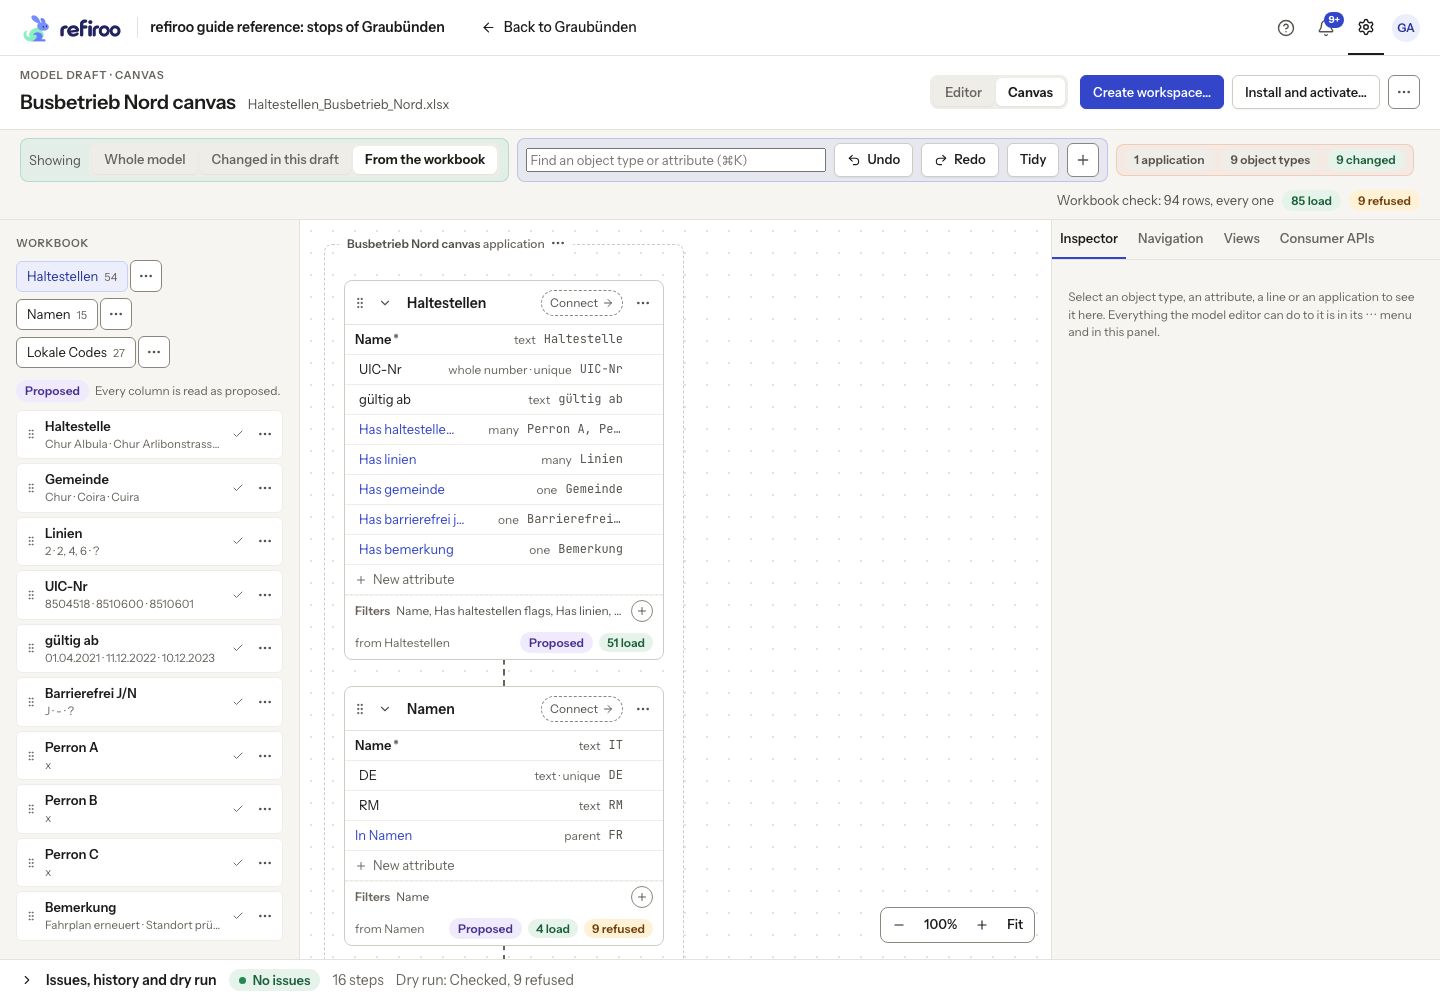
Above: The Busbetrieb Nord workbook draft after Adjust. Workbook check shows 85 rows to load and 9 refused; the proposed cards have not created a workspace.
Most drops save immediately as one step. A question opens only when a choice is needed. A refused change leaves the step unapplied and shows the reason above the board. Read it before trying again. Moving a card by its top bar only changes its position; use Connect to change how object types relate.
Make object types and map columns
Section titled “Make object types and map columns”- Drag a sheet’s tab onto empty space on the board, or choose Make an object type of this sheet in the tab’s ⋯ menu (the way by keyboard or on a phone). refiroo makes an object type, chooses a column for record names and maps the other named columns to attributes. Check those choices: a suggested value type does not establish what the column means. If the sheet is already fully read, a notice names the object type reading it instead of making another copy. If you cannot drag, add an Object type… with the header’s + menu, then map its columns through Inspector. For a sheet laid out as lists, Editor also offers Load as a list… in Source; see Read lists in a sheet.
- Drag a column onto a card to add an attribute. If that object type does not yet read this sheet, the first column supplies its record names instead. The column’s ⋯ menu offers Add to followed by the object type’s name, or a searchable chooser for many object types.
- For an exact destination, drop the column onto the card’s name row or an existing attribute. It supplies names or fills that attribute. Dropping it onto a parent or relationship row finds the other records by name, creating missing named records. Check that this is intended. Without dragging, select the column and use Map to… in Inspector to choose its meaning and destination; Map a workbook column explains the choices.
- Drag a column onto empty board space to make an object type of its distinct values. If an object type already reads the sheet, it gains a relationship to the new one; a mapped attribute becomes that relationship. With no existing reader, the new object type reads the column as names. The menu equivalent is Make an object type of its values. A column already used as a name, parent or relationship cannot be converted this way: leave it out of that reading first if you intend to replace it.
- To stop loading an attribute’s columns, drag its row back onto Workbook, or choose Leave out in each column’s menu. This leaves the model’s attribute in place and does not edit the original cells.
- To move an attribute to another object type, drag its row onto the other card, or use the attribute’s Move to… action. To reorder it in its current object type, drag it beside another attribute; a line shows the insertion point. Use Move up, Move down, or Alt+ArrowUp and Alt+ArrowDown on the focused attribute row for the same change.
Open a card’s or attribute’s ⋯ menu for the model editor’s other actions. Right-click or Shift+F10 on that element opens its menu too. For keyboard use, Tab to a menu button and press Enter, then choose the action.
Connect object types
Section titled “Connect object types”- Drag Connect from the object type that should be a child onto its parent’s card. The starting object type goes under the destination, with a solid containment line. Alternatively, use Put under in the card’s menu, or focus Connect, press Enter and choose Put under followed by the parent’s name.
- For a relationship instead, drag Connect onto an attribute row of the other card, or hold Alt while dropping onto the card. A dashed line connects the object types. The menu and keyboard choice is Relate to followed by the destination’s name.
- When workbook columns can supply the connection, refiroo compares their values across every row. If two columns match equally well, Which column names the … records? asks you to choose. Inspect the column names and matching-row counts. Closing the question changes nothing. None of them asks for an unfilled link; check the resulting notice and mapping, especially when both object types read the same sheet.
- If no column can be found or compared, the link can still be made. A notice says that nothing fills it yet. Drop the intended column onto the new parent or relationship row, or map it through Inspector. Inspect the new dry run before loading.
- Select a line to review its rule. Its × removes the connection: a containment’s child returns to the top level, or the permitted relationship is removed. Review the workbook mappings afterwards. The card’s Move to the top level action also removes containment.
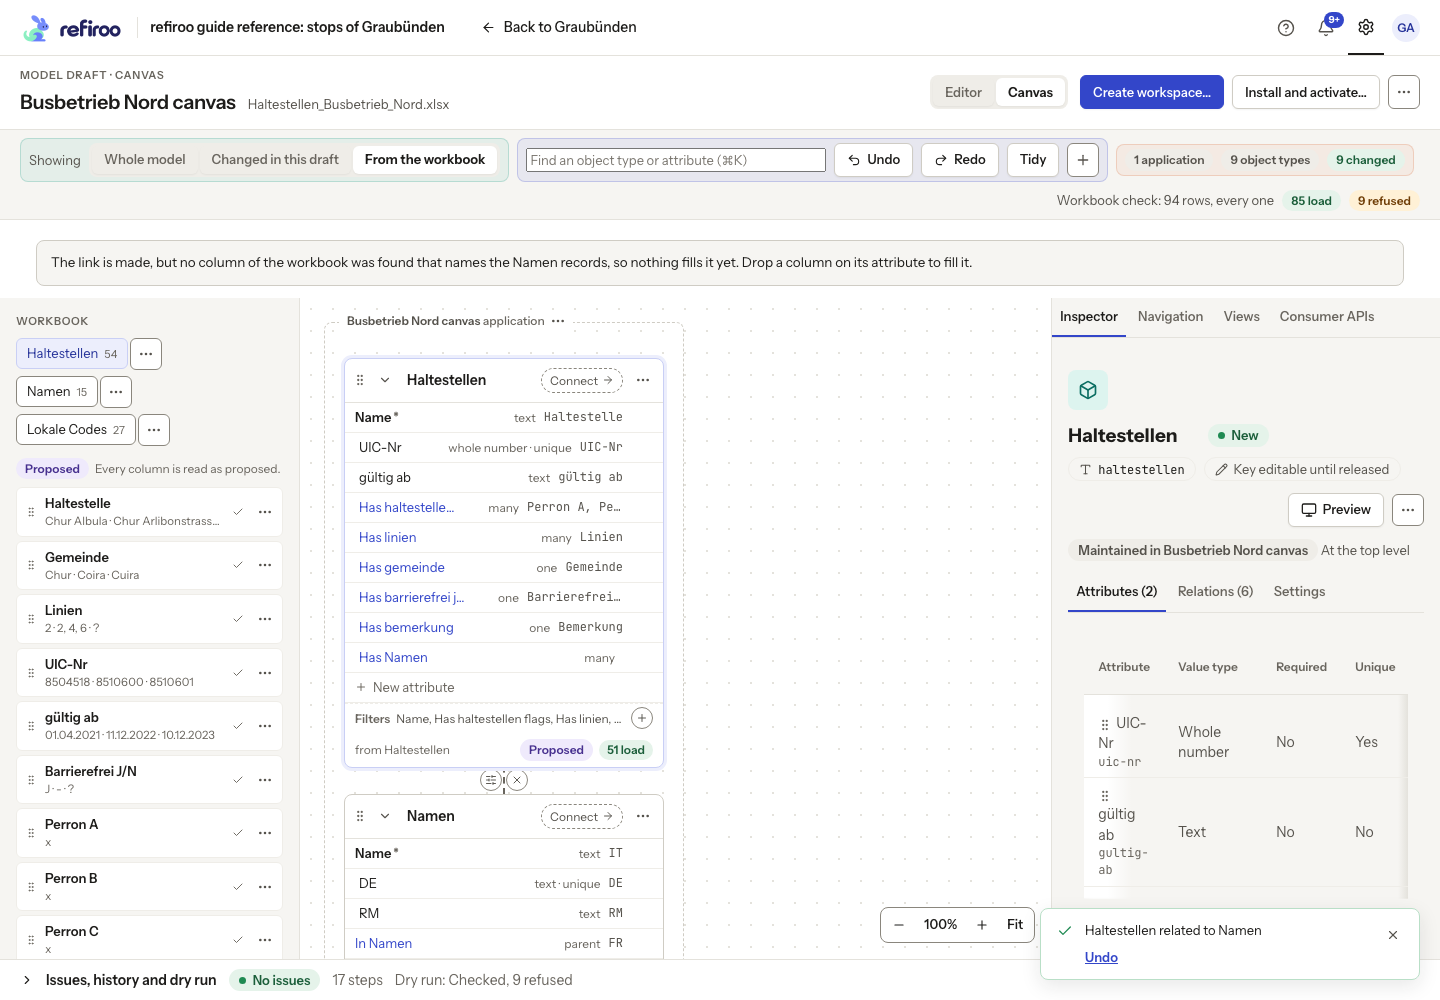
Above: Haltestellen is related to Namen. The notice says no workbook column was found to fill the link; Undo is available.
Moving a card close to another card does not connect them. A sheet supplies an object type through the board; use Connect between cards to relate them.
Read several columns as rows
Section titled “Read several columns as rows”Use this when column headers are values in their own right, rather than separate attributes.
- Select columns in Workbook. Ctrl-click or Command-click adds or removes a column; Shift-click selects a range. With the keyboard, Shift+Up or Shift+Down extends the selection, and Ctrl+Space or Command+Space toggles a focused column.
- Drag the selected columns onto a card or one of its rows. Alternatively, choose Read these columns as rows…, then the object type or attribute to fill.
- In The column’s header goes in and The cell goes in, name the two columns the reading adds. Use different names that the table does not already have. Choose Read as rows.
- Each filled cell becomes a row, carrying its original header in one new column and its value in the other. Empty cells produce no row. A drop on a name, parent or relationship row uses the headers there; a drop on an attribute uses the cell values there. The other new column becomes an attribute. A card drop adds both as attributes.
- Check the new columns and the dry run. To reverse the reading, open an affected column’s menu and choose Stop reading these columns as rows. Review the mappings it removes.
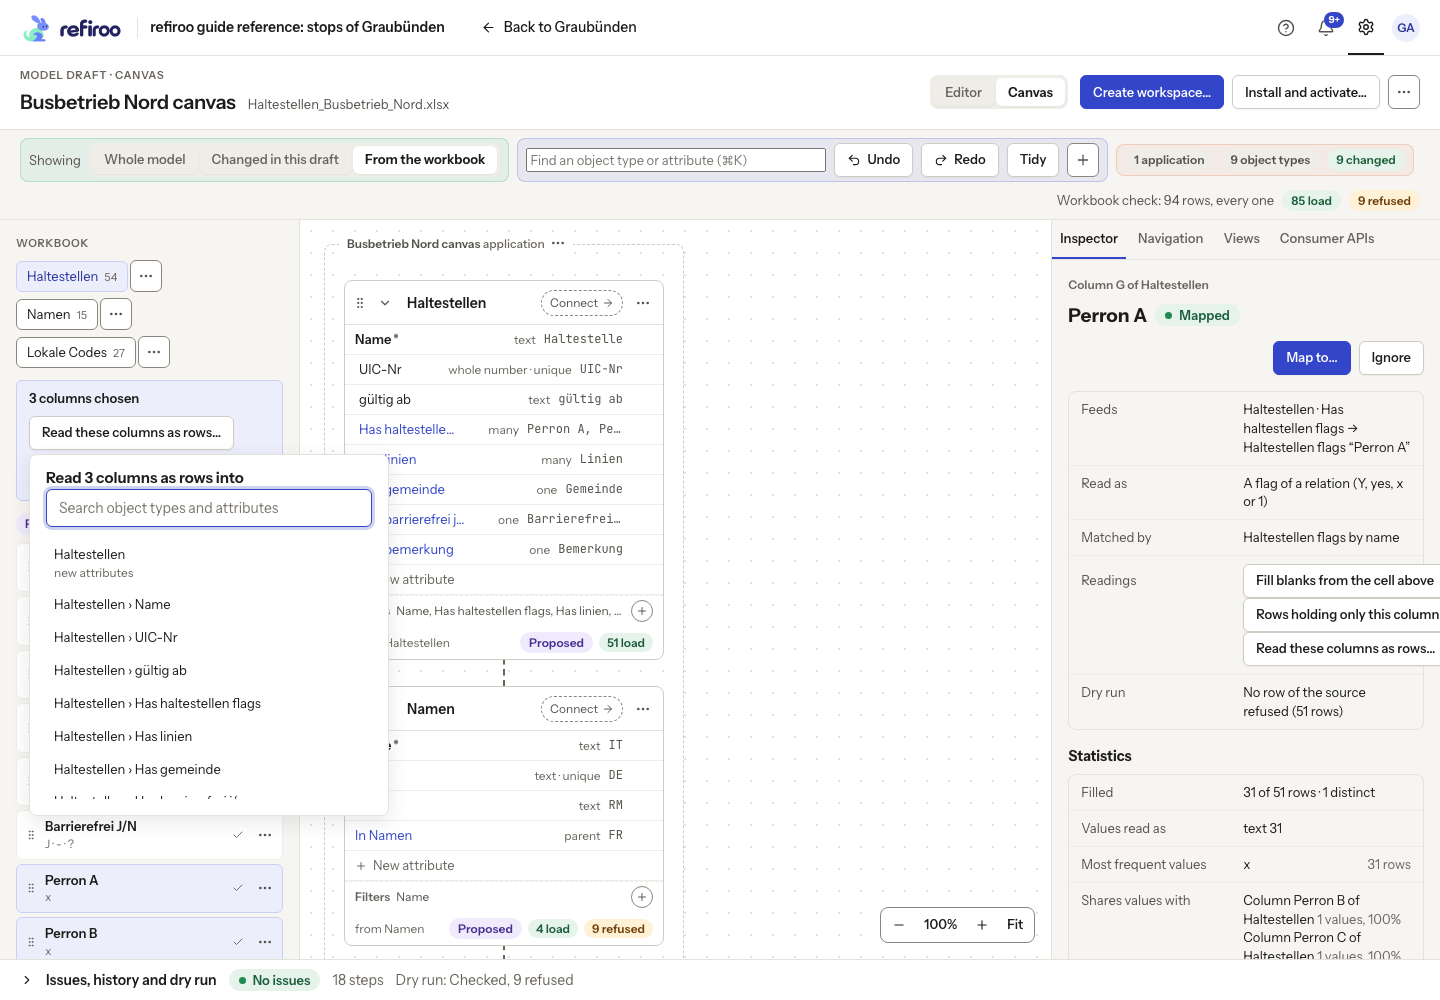
Above: Perron A, Perron B and Perron C are selected. Read 3 columns as rows into asks which object type or attribute to fill.
Example. A stop-names sheet might have a column for each language. Reading those columns as rows makes each filled name a row with its language beside it. The model still decides which object type holds names and how it relates them to stops and languages.
Correct how the sheet is read
Section titled “Correct how the sheet is read”- In First rows, press the row number holding the headers. This changes the header row for the reading sources on that sheet. The preview is a small window of cells; it is not proof that the whole sheet loads. A sheet needs an object type reading it before a header change can be saved. Use Adjust list… in the list panel for a precise range.
- For a column whose blanks repeat the preceding value, open its ⋯ menu and choose Fill blanks from the cell above. The reading carries the last filled value down that column; it does not rewrite the workbook. Stop filling blanks from the cell above reverses it.
- For section headings, choose Rows holding only this column are headings…. A heading row has a value in that column and no other filled cell. In the question, name the added column under The heading goes in a new column called, then choose and names the parent in. Select an existing object type or A new object type… and supply its name. Choose Read headings.
- A heading is not itself a data row: its text names the parent of following rows until the next heading. A genuine record filled only in that column would also be treated as a heading, so check for that case. The column menu’s Stop reading rows holding only this column as headings reverses the reading.
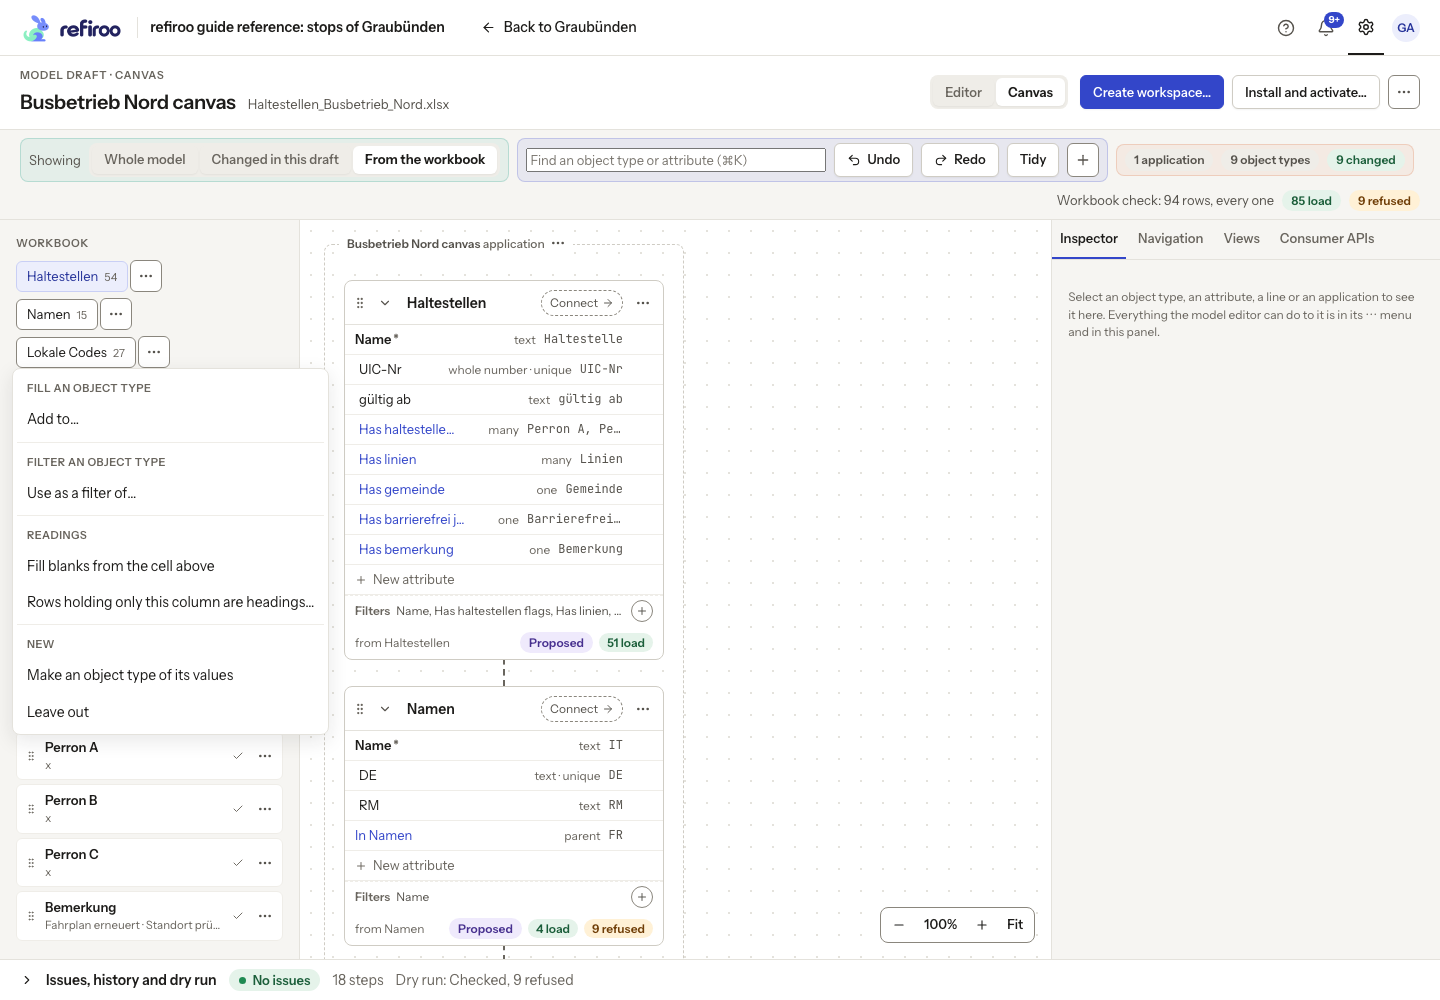
Above: The Perron A menu offers Fill blanks from the cell above, Rows holding only this column are headings…, Make an object type of its values and Leave out.
Heading rows are read before blanks are filled, then the selected columns are read as rows. These are saved reading instructions, used by the dry run and the eventual load alike. You can also set them in the model editor: a column’s Readings row offers Fill blanks from the cell above, Rows holding only this column are headings… and Read these columns as rows…, with the corresponding Stop… entry while a reading is on. A loaded list’s Readings row also offers Read these columns as rows…; there you select the columns before naming the two added columns. The Source pane marks columns that have a reading.
Add filters and arrange navigation
Section titled “Add filters and arrange navigation”- Drop a column onto a card’s Filters area to add a table filter. refiroo maps an attribute if needed and makes it filterable. Alternatively, press the + in Filters, choose Add a filter… in the card menu, or use the column menu’s Use as a filter of. A table view is required; if none can hold the filter, read the notice and add or correct the table view before trying again.
- Open Navigation in the inspector. Drag the card’s Connect onto a navigation group to place its collection there, onto New group to create a group for it, or onto Not in a group to leave it ungrouped. Dragging the card’s top bar only moves the card.
- Without dragging, use Move to group in the card menu for an existing group, or press Enter on Connect and choose Place in the group. For a new group, use the application’s navigation menu, then place the collection. Group and entry menus offer naming and ordering actions; see Group collections in navigation.
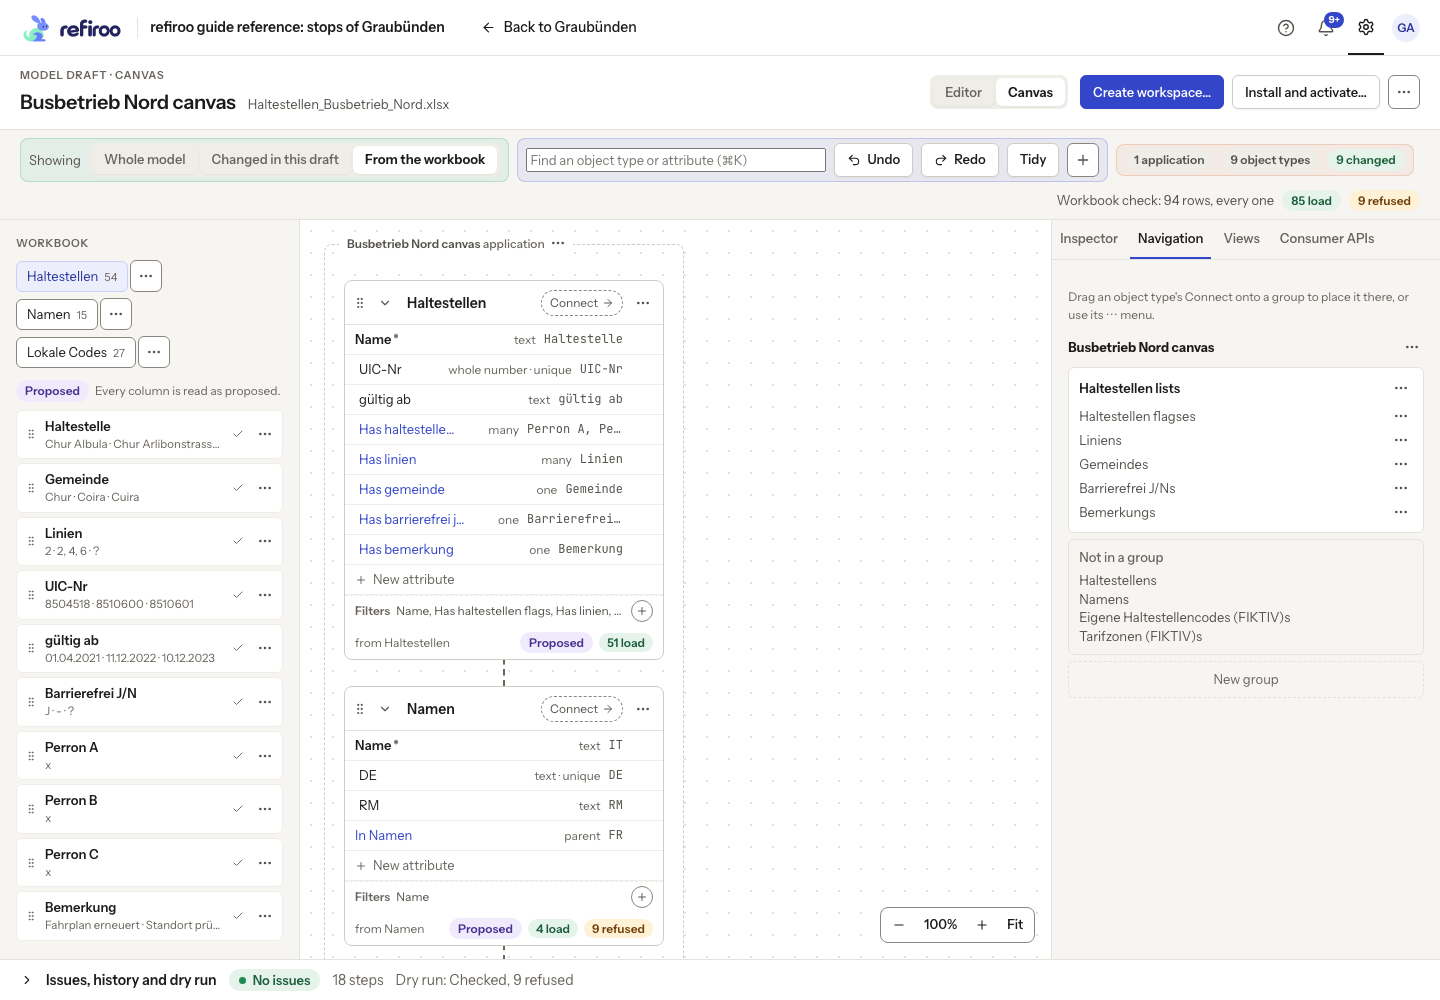
Above: Navigation shows the proposed Haltestellen lists group, entries Not in a group and a New group destination.
Check refused rows and correct a value
Section titled “Check refused rows and correct a value”- Read Workbook check above the board. Checking… means the latest result is not ready; you can keep editing. A completed result covers every mapped row. The load figure counts records created, updated or unchanged across the reading sources; it is not always the number of spreadsheet rows. Several readings can use the same sheet.
- Press a card’s refused count to open rows refused. Each reason has its row count. Choose See the rows to inspect the sheet rows and their explanations. The Dry run tab in Issues, history and dry run also gives the full source-by-source result, including skipped rows; see Check a workbook with a dry run.
- When an unmatched reference identifies a column, Correct the values of … opens its value map. Review Text in the file and enter the intended replacement in Becomes. An empty Becomes means no value, not “leave unchanged”. Choose Save the value map. This corrects how the file is read, not its original cells.
- For other refusals, correct the model, mapping or source value according to the reason. Wait for the new check. If a check cannot finish, use the drawer’s retry after correcting its cause; a failed check is not a zero-refusal result.
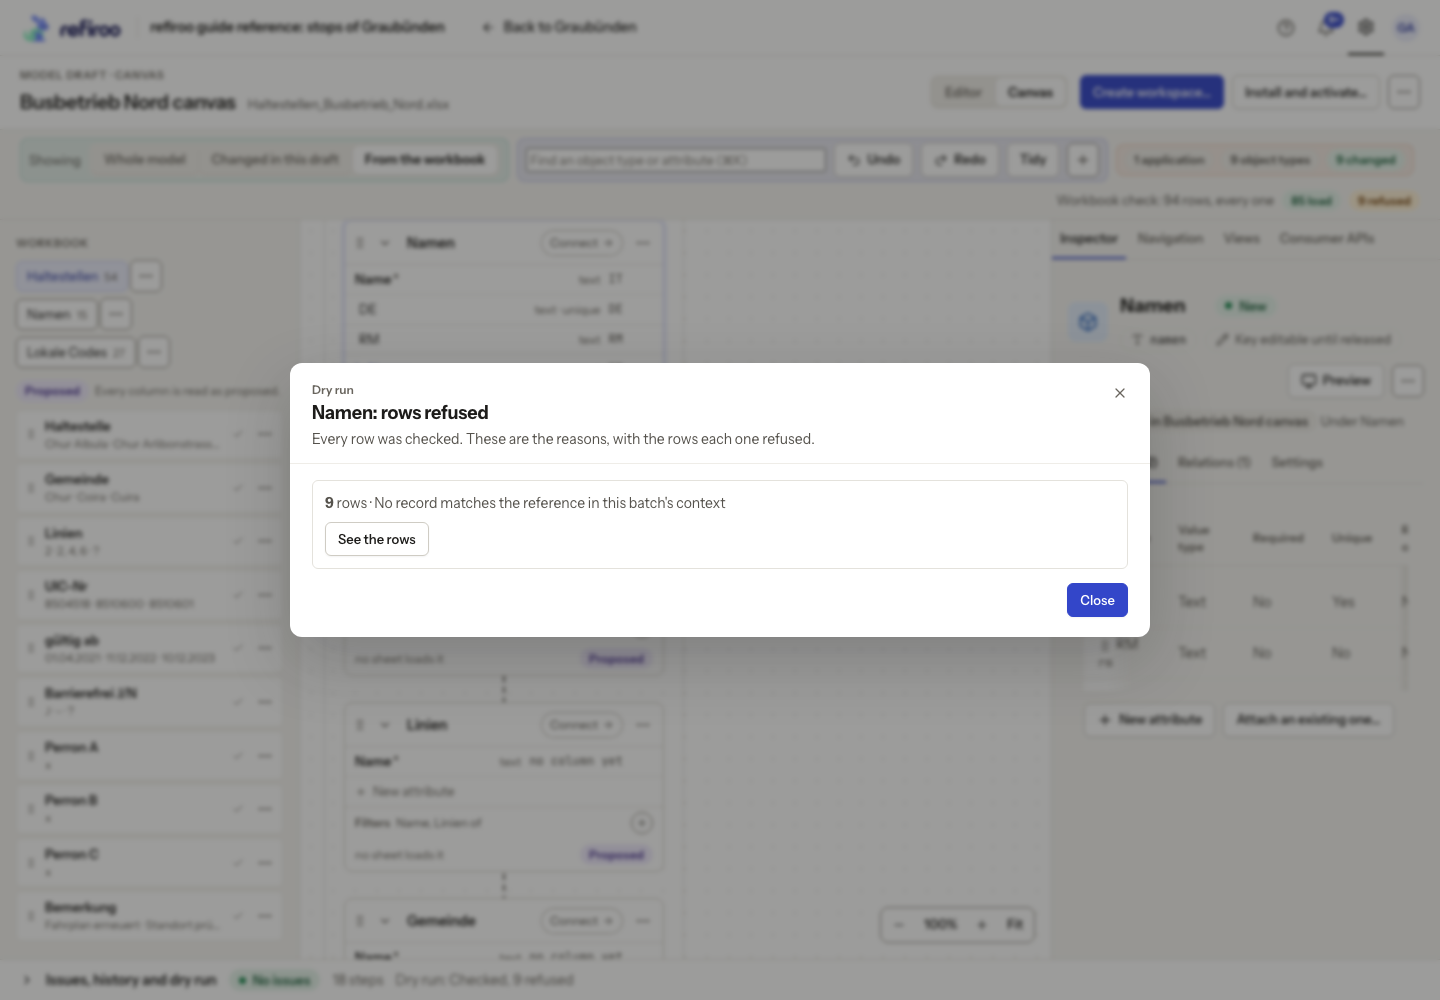
Above: Namen has 9 refused rows because no record matches the reference. See the rows opens their details.
Undo, then finish
Section titled “Undo, then finish”- Use Undo and Redo in the header. For a particular saved step, expand Issues, history and dry run, choose History and its undo action. If later steps depend on it, read the explanation before agreeing to undo them together. A new edit clears redo.
- Resolve blocking Issues and review every source’s latest Dry run. Saved draft changes do not change live records until you apply or load them.
- To make a separate workspace, choose Create workspace… when offered. Enter Name, review the load and refusal figures and choose Create workspace. This installs the model, creates the workspace and starts loading into Live. Refused rows stay out. The new workspace’s page shows the load’s progress and result. If creation is refused, read the reasons and correct the draft before trying again.
- For a draft belonging to a workspace, use Apply to this workspace… to review its model change. Install and activate… reviews installing a release and selecting its workspace; it is also in More actions for a workspace draft. Neither replaces reviewing a load.
- To load into an existing workspace through a change set, use More actions, Load into a change set…. Follow Load a workbook into a change set for the installation, destination and unpublished result. Propose again… and Upload a newer workbook… are also in More actions.
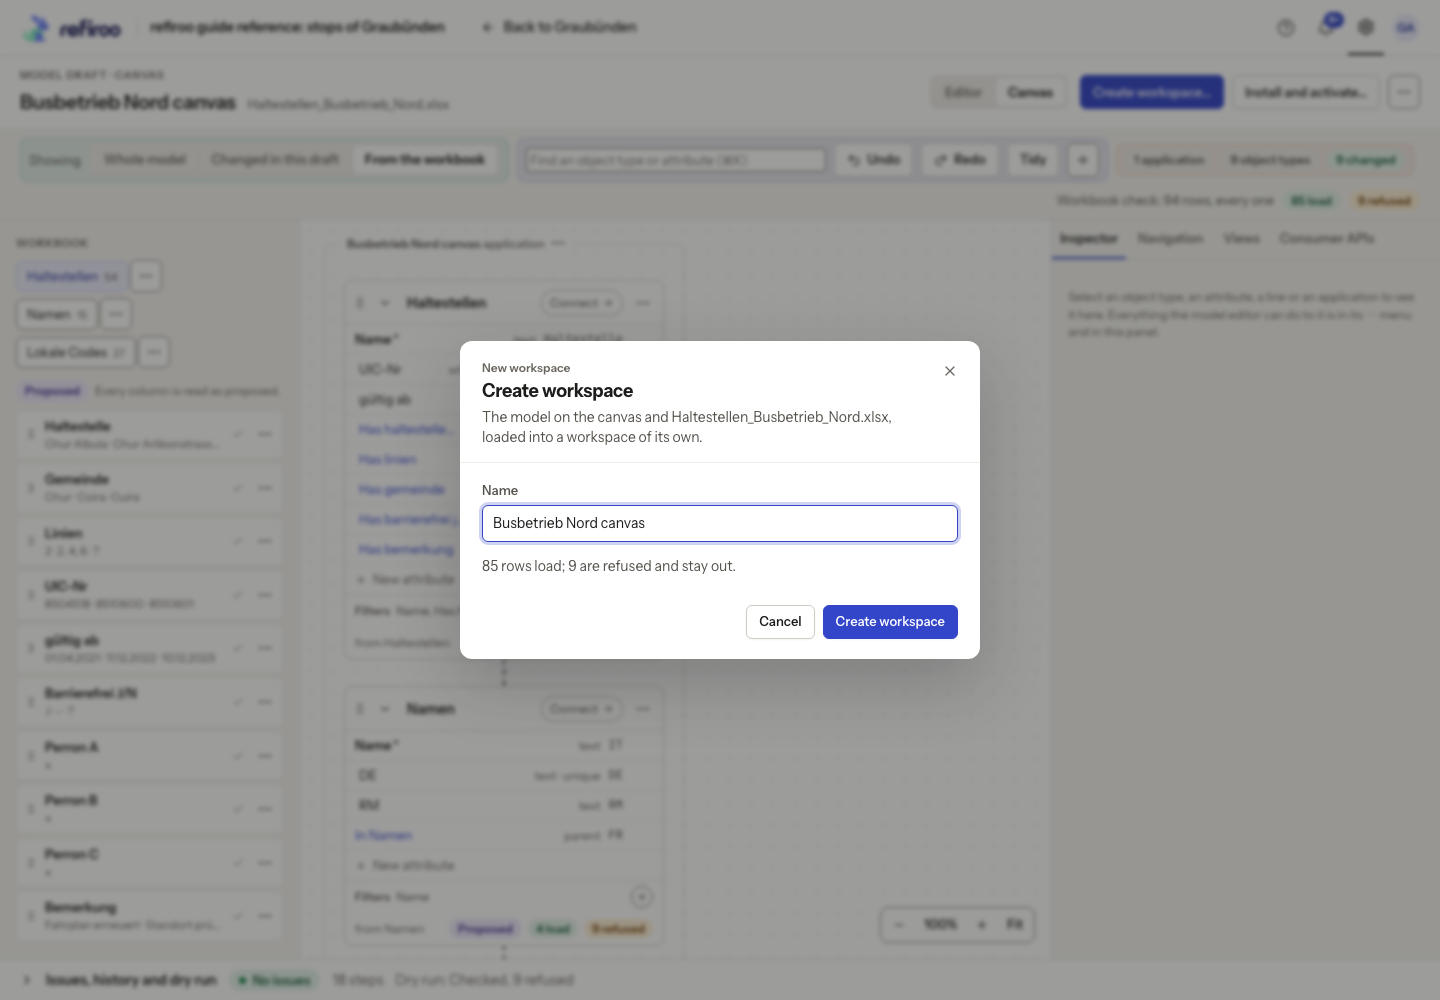
Above: Create workspace proposes Busbetrieb Nord canvas as the name and reports 85 rows to load and 9 refused rows that stay out. Creation has not been confirmed.
Create workspace… appears only when the draft has a workbook reading an object type shown on the board, does not already belong to a workspace, and you hold the required permissions. Use From the workbook or Whole model if a narrow scope hides the reader.
On a phone
Section titled “On a phone”At phone width the parts stack vertically and the cards form one column. Dragging, relationship lines, frames and board zoom are unavailable. Use the column and element menus, Connect and the inspector instead. Selecting an element brings the inspector into view. For a sheet not yet read by an object type, add an Object type… and map columns through Inspector, or use Editor and its Source actions for a sheet laid out as lists.
For adding and editing the model without workbook gestures, follow Edit a model on the canvas.